1. How to work and colaborate#
This first module’s goal is to describe what we learnt during the first two weeks. I will try to be sufficiently clear and complete so that anyone could replicate what we have done. The first courses allowed us to meet each other and to meet the FabLab itself. Then we learned to use tools such as Git, Mkdocs but also how to manage a project.
Project Management#
We were first introduced to some project management fundamentals that I will describe below and explain how I applied them.
Modular and hierarchical planning#
When you are given a task, it is essential to decompose it in smaller sub-tasks and then order them in an importance hierarchy.
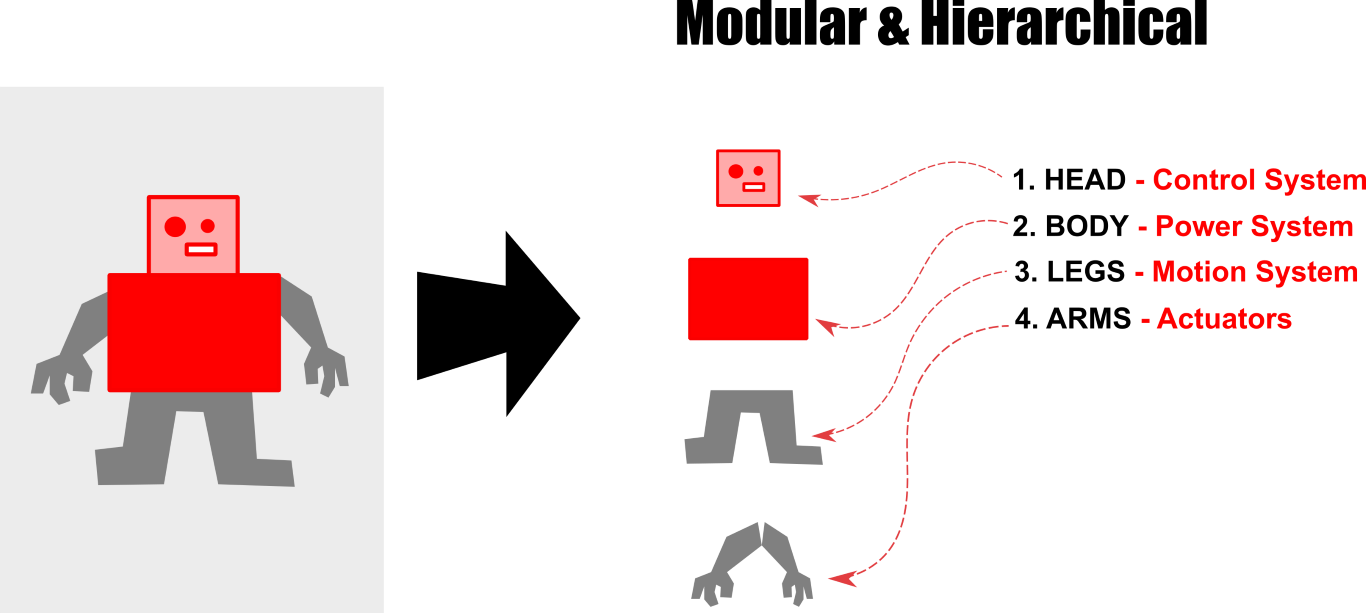
For instance, during the project management work session at FabLab, the hierarchical order I fixed was :
- Installing Git properly
- Understanding how to synchronize my remote working copy with the online version
- Installing Mkdocs
- Understanding how to use Mkdocs
- Documenting what I learned
This hierarchical order was actually an ordering by difficulty. Indeed, the teacher was there to help us hence it was better to let the tasks I could do alone for later.
I had time to do the two first steps in class and I did the others at home.
Supply-Side time management#
Supply-side time management consists in constructing a precise time schedule to organize your work. You have to decide how much total work time you have in the week and precisely the duration of each work session. Then you distribute all the tasks that have to be finished at the end of that week in all the work slots. This time management method is way more efficient than simply working on each tasks one after the other each time you consider you “have time” to work.
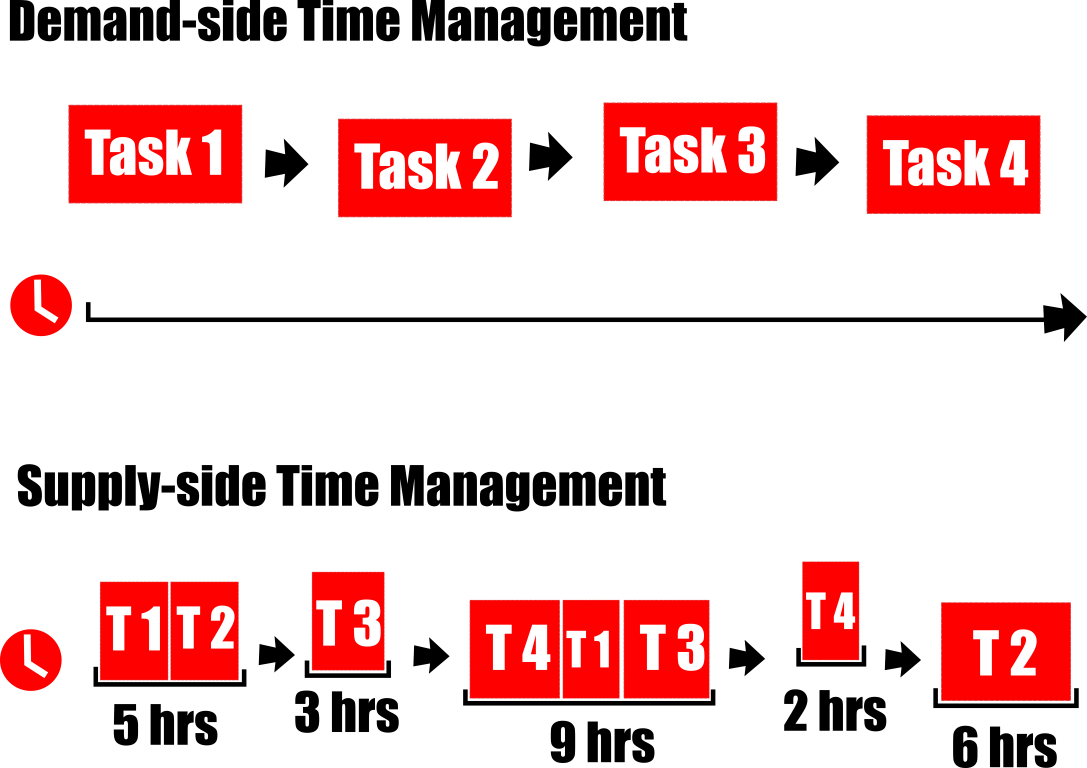
Triage#
Triage is a dynamic selection of the tasks you consider to be important. The word dynamic is important since you have to redo this selection at each work session considering what you were already able to do in the available time and what is left to do. This management technique is essential when you do supply-side time management.
Spiral development#
Spiral development consists in completing the minimal amount of work needed for a task to be considered done and then gradually improve the quality of your work. It ensures that the task will be done in time and allows you to improve its quality only if you have time left.
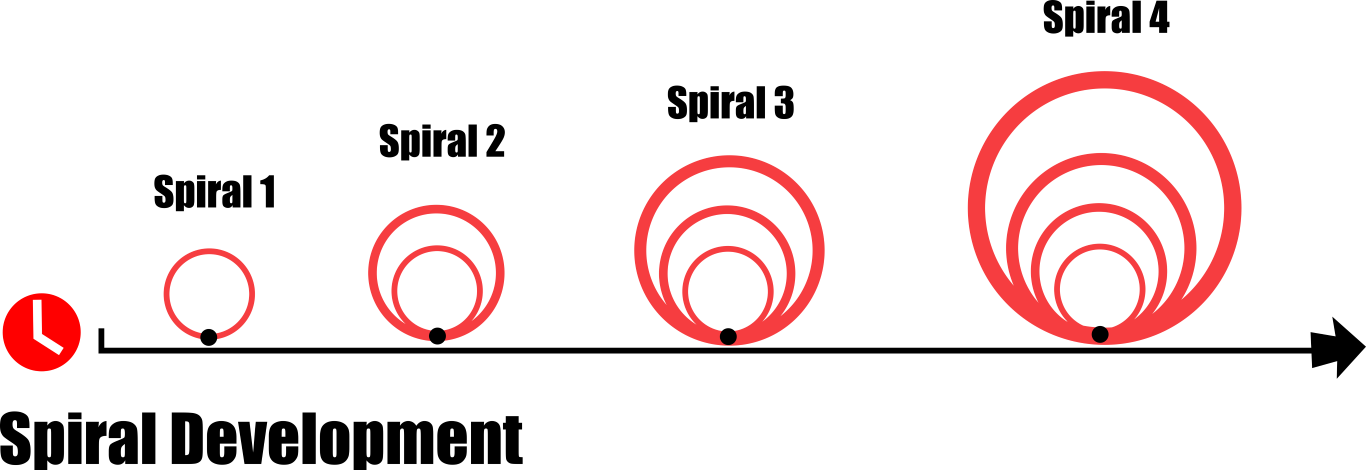
For instance, concerning this part of my documentation, I started by writing briefly what I learned, then added some details and examples and finally some pictures.
Parallel development#
Parallel development completes the spiral development method. It consists in working on many tasks at the same time instead of working on the next task only if the previous one is finished. Combined with the spiral development it means in particular that you only start improving the quality of your work once all the tasks are completed at the minimal level.
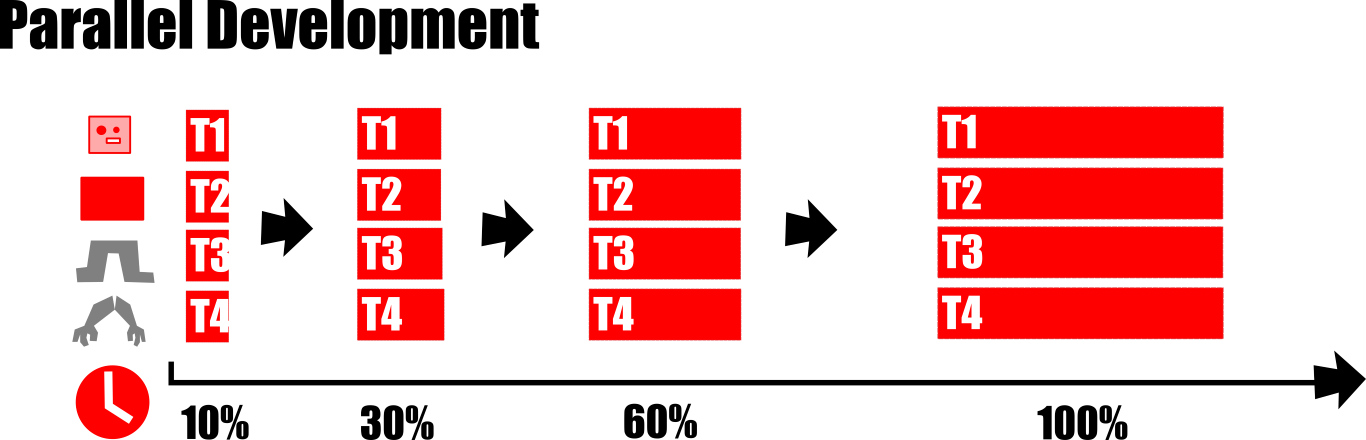
For instance on this web page, I first wrote the general description of project management, Mkdocs and Git before adding details and pictures in each one of the parts.
As-you-work documentation#
As you work documentation is maybe the most important working method among the ones presented here. It is also the easier to understand. If you wait to have completely finished your work before documenting it, it is obvious that you will not remember the details, difficulties and all the process you went through to realise the first tasks.
Also, during your work advancement, when you use wrong methods, follow wrong ways to solve a problem, you tend to omit these parts of the process if you write about your work only once it is finished since you know what is the good way to do it. Nevertheless, documenting about your mistakes can be really usefull for people doing similar works and even for you later. Sometimes, your mistakes can even lead to new ways of thinking or new project ideas.
Don’t forget, mistakes are sometimes the most intersting steps in a research process.
Useful tools#
Using Git#
After theory, a bit of practice. We learned how to manage a project using Git. I will detail the steps to configure and use Git below.
The second main step described bellow concerns the SSH key setup. It was not an easy task and it took me almost the whole two class hours, however following exactly what I explain bellow should get you to your goal.
- Install Git on your computer.
-
Setup a secured connection with a remote server using a SSH key.
- You first need to check if your computer already has a SSH key. If it’s the case, a
.ssh/subdirectory should exist in your home directory. The SSH key is the value contained in the.pubfile of the.ssh/subdirectory. If your computer has an existing SSH key, skip to step 5. If not, continue. -
If your computer doesn’t have an existing SSH key, generate a new one. Open a terminal and run
ssh-keygen -tfollowed by the key type and an optional comment. For example, for a ED25519 key type, which is the one I generated as it is said to be the safest, you’d run :ssh-keygen -t ed25519 -C "<comment>" -
The following output should be displayed :
``` Generating public/private ed25519 key pair.
Enter file in which to save the key (/home/user/.ssh/id_ed25519):The key should now be confirmed to be generated. A
.ssh/subdirectory should now be existing in your home directory. -
Once the key exists on your computer, you need to add it to your GitLab account. First copy the key, which is the content of the
.pubfile contained in the.ssh/subdirectory. -
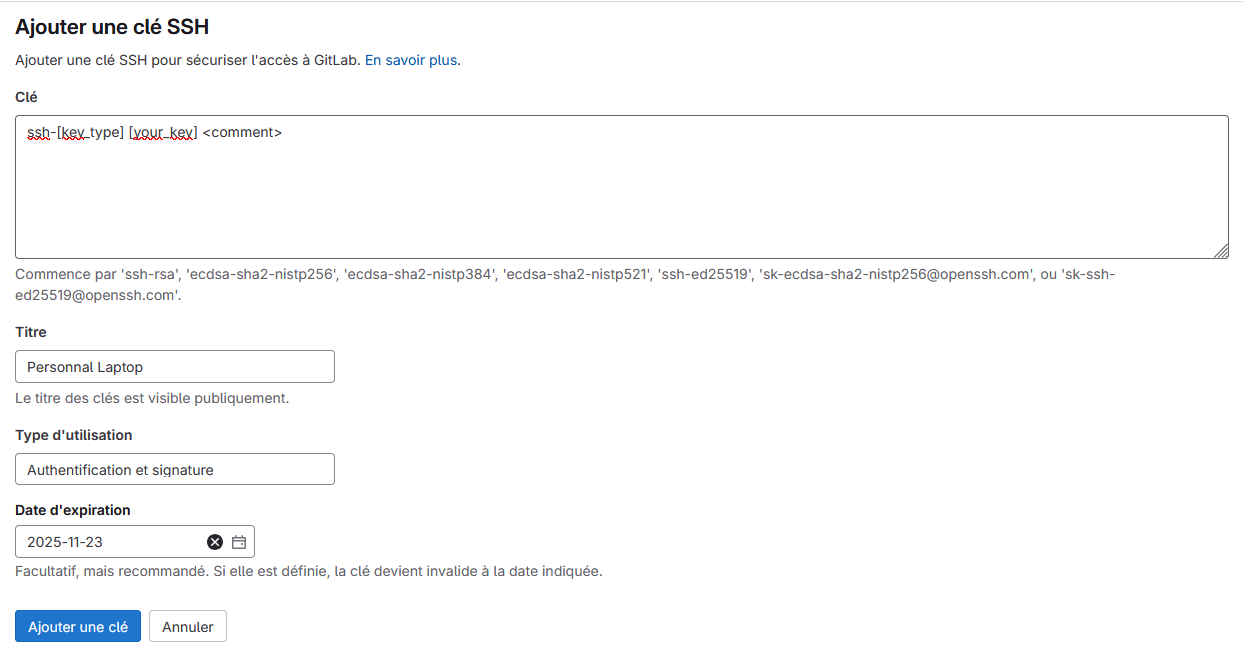
Sign in to GitLab.
-
Select your avatar on the upper-left corner and select Edit profile.

-
On the left side-bar select SSH key and then Add new key.

-
In the Key box , paste the content of your public key. Make sure you copied the entire key which should start by
ssh-followed by your key type and may end by a comment. -
In the Title box, type the description of the computer associated to the key (Personnal laptop, Work laptop, etc.)
-
The rest is optional thus you can directly select Add key
-
Your GitLab account should now be connected to your computer in a secured way. To verify that the connection is well established, the tutorial tells you to run
ssh -T git@gitlab.username.combut it did not work for me. Instead, I tried to runssh -T git@gitlab.comand it worked ! -
If this is the first time you connect, you should get a message similar to the one bellow :
The authenticity of host 'gitlab.example.com (35.231.145.151)' can't be established.
ECDSA key fingerprint is SHA256:HbW3g8zUjNSksFbqTiUWPWg2Bq1x8xdGUrliXFzSnUw.
Are you sure you want to continue connecting (yes/no)? yes
Warning: Permanently added 'gitlab.example.com' (ECDSA) to the list of known hosts.
Type
yesand press Enter. -
Run the
ssh -T git@gitlab.comcommand again. You should receive aWelcome to GitLab, @username!message. Congratulations, your GitLab account is well connected to your computer in a secured way !
- You first need to check if your computer already has a SSH key. If it’s the case, a
-
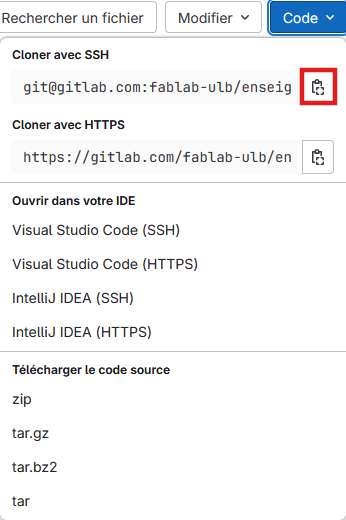
Clone a working copy of a remote project on your computer.
- Sign in to GitLab.
- Select the project you want to remote control from your computer.
-
On the upper-right corner of the main page of your selected project, select Code then copy the URL for Clone with SSH.
-
Open a terminal and go the directory where you want to clone the files contained in your GitLab repository.
- Run the command
git clone <copied URL>after inserting the URL you just copied. - Git will then automatically create a folder with the repository name and downloads all the files in there. Your remote working copy is now ready to be used.
-
Work on your remote working copy and sychronize with the remote server.
- Open a terminal and go to the directory created by Git which is named after the Git repository you cloned.
- Dowload the latest changes if there are by running the command
git pull -
If you want to upload your modifications to the remote server run the following commands :
git add *git commit -m "DESCRIPTION OF THE MODIFICATIONS"git push
If one of your colleagues now wants to download your modifications on his own remote working copy, he can do it by running the
git pullcommand.Stop and read carefully ! Git stores every single modification you make. It is very usefull since you can recover any version of your work. However your repository’s volume can grow rapidly if you don’t be carefull about the files you upload on your repository.
Creating a website with Markdown#
After Git, we learnt to create a website containing the documentation of our work such as the one you are reading at the moment. Markdown is a light language used to edit text on documentation websites. It is easier to learn and manipulate than HTML but it needs to be converted in HTML to be displayed on a website. Mkdocs is an example of converter to HTML program which allows us to easily modify the website features such as the theme, the title, the icon, etc.
Markdown language#
The Markdown language is a light coding language which allows one to write documentation websites without having to learn HTML. A markdown file is simply a text file usually appended with a .md extension.
Its basic syntax can be found on the Markdown Guide but I will describe the important points below.
| Syntax | Output |
|---|---|
# Main Title |
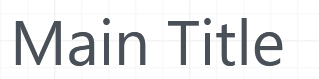 |
## Subtitle |
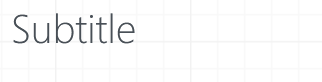 |
First paragraph. EnterEnter Second paragraph. |
 |
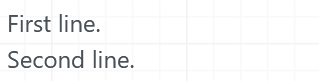
First line. SpaceSpaceEnter Second line. |
 |
**Bold words** |
 |
_Italic words_ |
 |
Quote : Enter >Block quote Enter Enter End of quote. |
 |
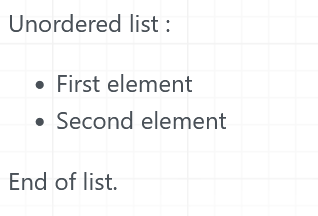
Unordered list : Enter Enter - First element Enter - Second element Enter Enter End of list. |
 |
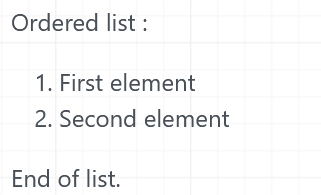
Ordered list : Enter Enter 1. First element Enter 2. Second element Enter Enter End of list. |
 |
Links and images insertion#
It is also possible to generate clickable words that leads to a specific link. The syntax is :
[Clickable word or group of words](https://www.example.com)
The image insertion syntax is quite similar but you must start with a ! :

The image description is usefull in two cases. First, if the image can not be displayed for any reason, the description replaces the image. Then, for people needing an audiodescription, the image description allows to understand what is displayed.
Mkdocs#
To get started with Mkdocs, you can follow their tutorial which is summarized below :
-
Open a terminal in the directory where you want your files to be stored. If you want the source code of your website to be stored on a Git repository, the directory should be your local remote working copy of the repository.
-
Create a new project by running the command line
mkdocs new my-project. The directory in which you ran the command line should now contain anmkdocs.ymlfile and adocs/subdirectory. -
Mkdocs comes with a built-in dev-server that allows us to preview the documentation website while we work on its source markdown code. In order to do that, be sure you’re in the same directory as the
mkdocs.ymlfile and run the command linemkdocs servethen open up http://127.0.0.1:8000/ in your browser (of course, if the previous steps were not correctly done, the link won’t work) and voilà ! You can directly see how your website looks like while you work on the associated markdwon files :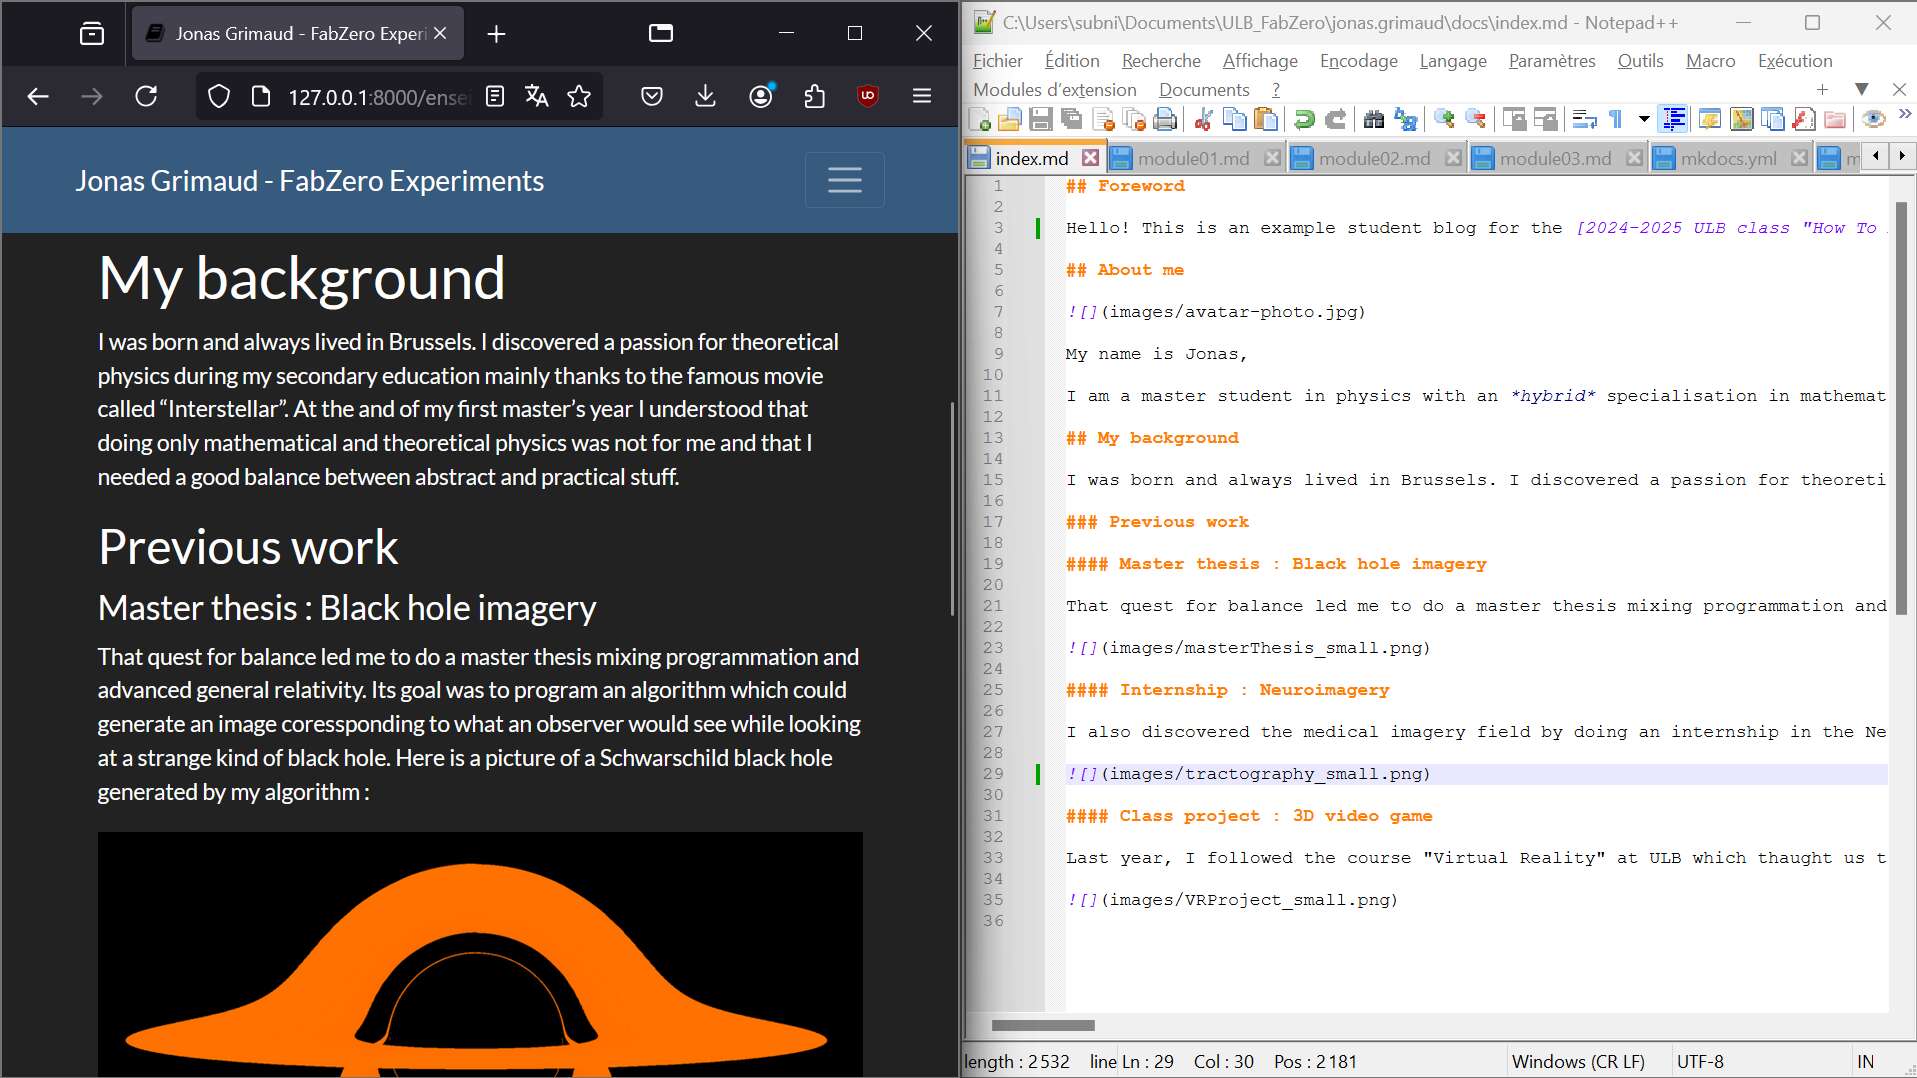
-
Edit your website properties by modifying the
mkdocs.yml.-
When you create a new project, the
mkdocs.ymlshould only contain :The
site_namefeature is mandatory for the website to be working. You can modify it to change the website name. -
You can add pages by creating new markdown files in the
docs/subdirectory. In order to organize them, you need to add anavsetting in themkdocs.ymlfile : -
In a similar way you can add a website description, modify the theme, indicate the source code location etc. An example of
mkdocs.ymlusing these features is presented below :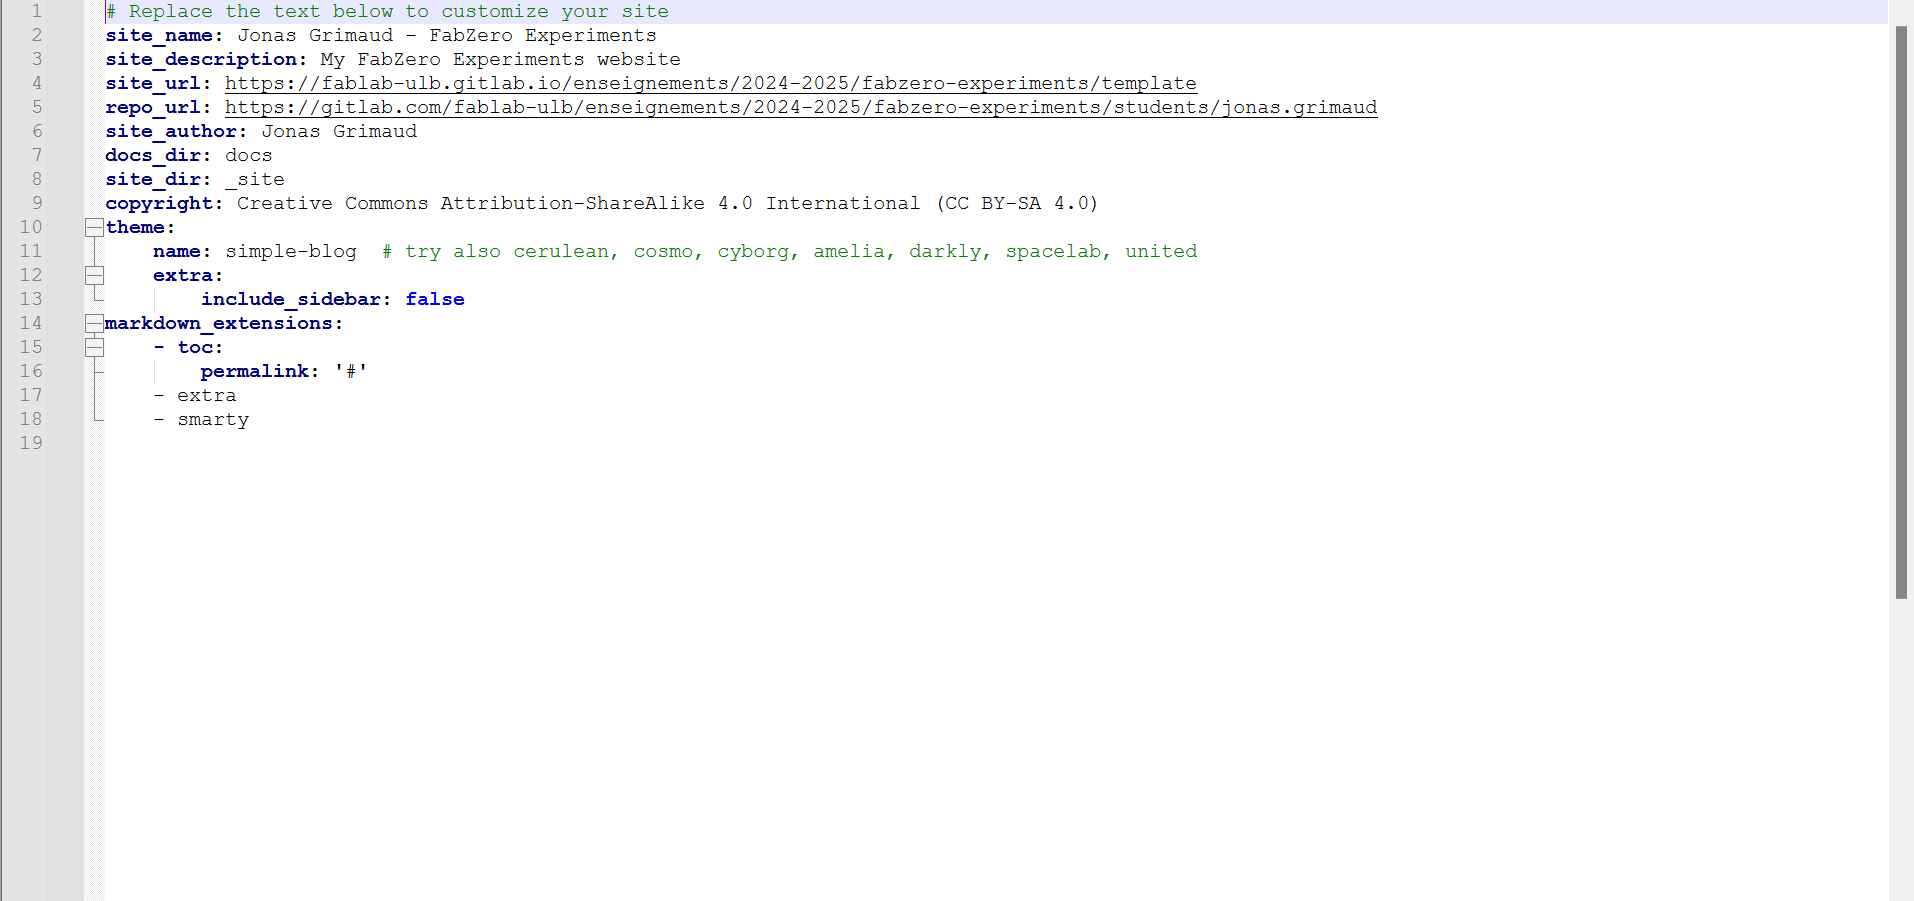
-
Manipulating images#
Inserting images and videos could rapidly increase the volume of your site. To avoid that, it is recommended to reduce the size of the pictures and videos you want to be displayed.
PNG vs JPG#
First of all you have to be carefull about the file format you use for your images. We will only discuss about pixelised images here, vectors ones will be discussed in the next module. Two main file formats exist for pixelised images :
.png.jpg
The .png format directly contains each pixel’s color information while the .jpg format contains information about the Fourier transform of the picture. The compression process of a .png file may thus happen without information loss while a .jpg compression happens with information loss. However, the structure of a .png file itself makes high color variation pictures difficult to manipulate while .jpg in which Fourier coefficient are directly encoded does not have that issue.
For this website, I made the mistake to use .png format for highly coloured images. Unfortunately, I had already uploaded the pictures on my Git repository when my mistake was found and as Git stores every modifications, I had to think about the following dilemma : “Is it better to let a .png format for a highly coloured picture or replace it by a .jpg one but thus have a useless file (the .png) in my repository ?” I chose the latter option in order to have a “clean” website but at this point I started to be really carefull about what I uploaded on my repository.
Image compression#
To edit my images, I chose to use Image Magick. This program can be used through the command line hence it is not needed to learn a new graphical interface. For instance, I used it to easily resized my images by running command lines such as :
If, like me, you made the mistake to use the.png format for highly coloured pictures and you want to convert them in a low quality .jpg format, and that you want to convert all the files from a directory you can use the following command :
The mogrify command will convert all files of the directory from which you execute it. It has some parameters as the aimed format, quality and the file type you want to convert.